In this chapter, we'll explore various examples and use cases of Reken by implementing a sample employee directory application. These examples will help you understand how Reken can be applied to different scenarios and highlight its versatility in building dynamic web applications.
 .
.
Reken excels at creating dynamic web pages with minimal effort. Adding Reken attributes to your HTML elements, lets you easily make your web pages interactive and responsive. Here are some common examples of building dynamic web pages with Reken. The data we will use is an employee object.
const employee = {
 "name": "Mary Taylor",
 "email": "[email protected]",
 "phone_number": "555-0200",
 "department": "Customer Service",
 "location": "Dallas, TX",
 "gender": "Female",
 "employee_number": "10009",
 "photo": "photos/10009.jpg"
}-
Dynamic Text and Content: Use
data-textanddata-htmlattributes to update the element's text or HTML content real-time.
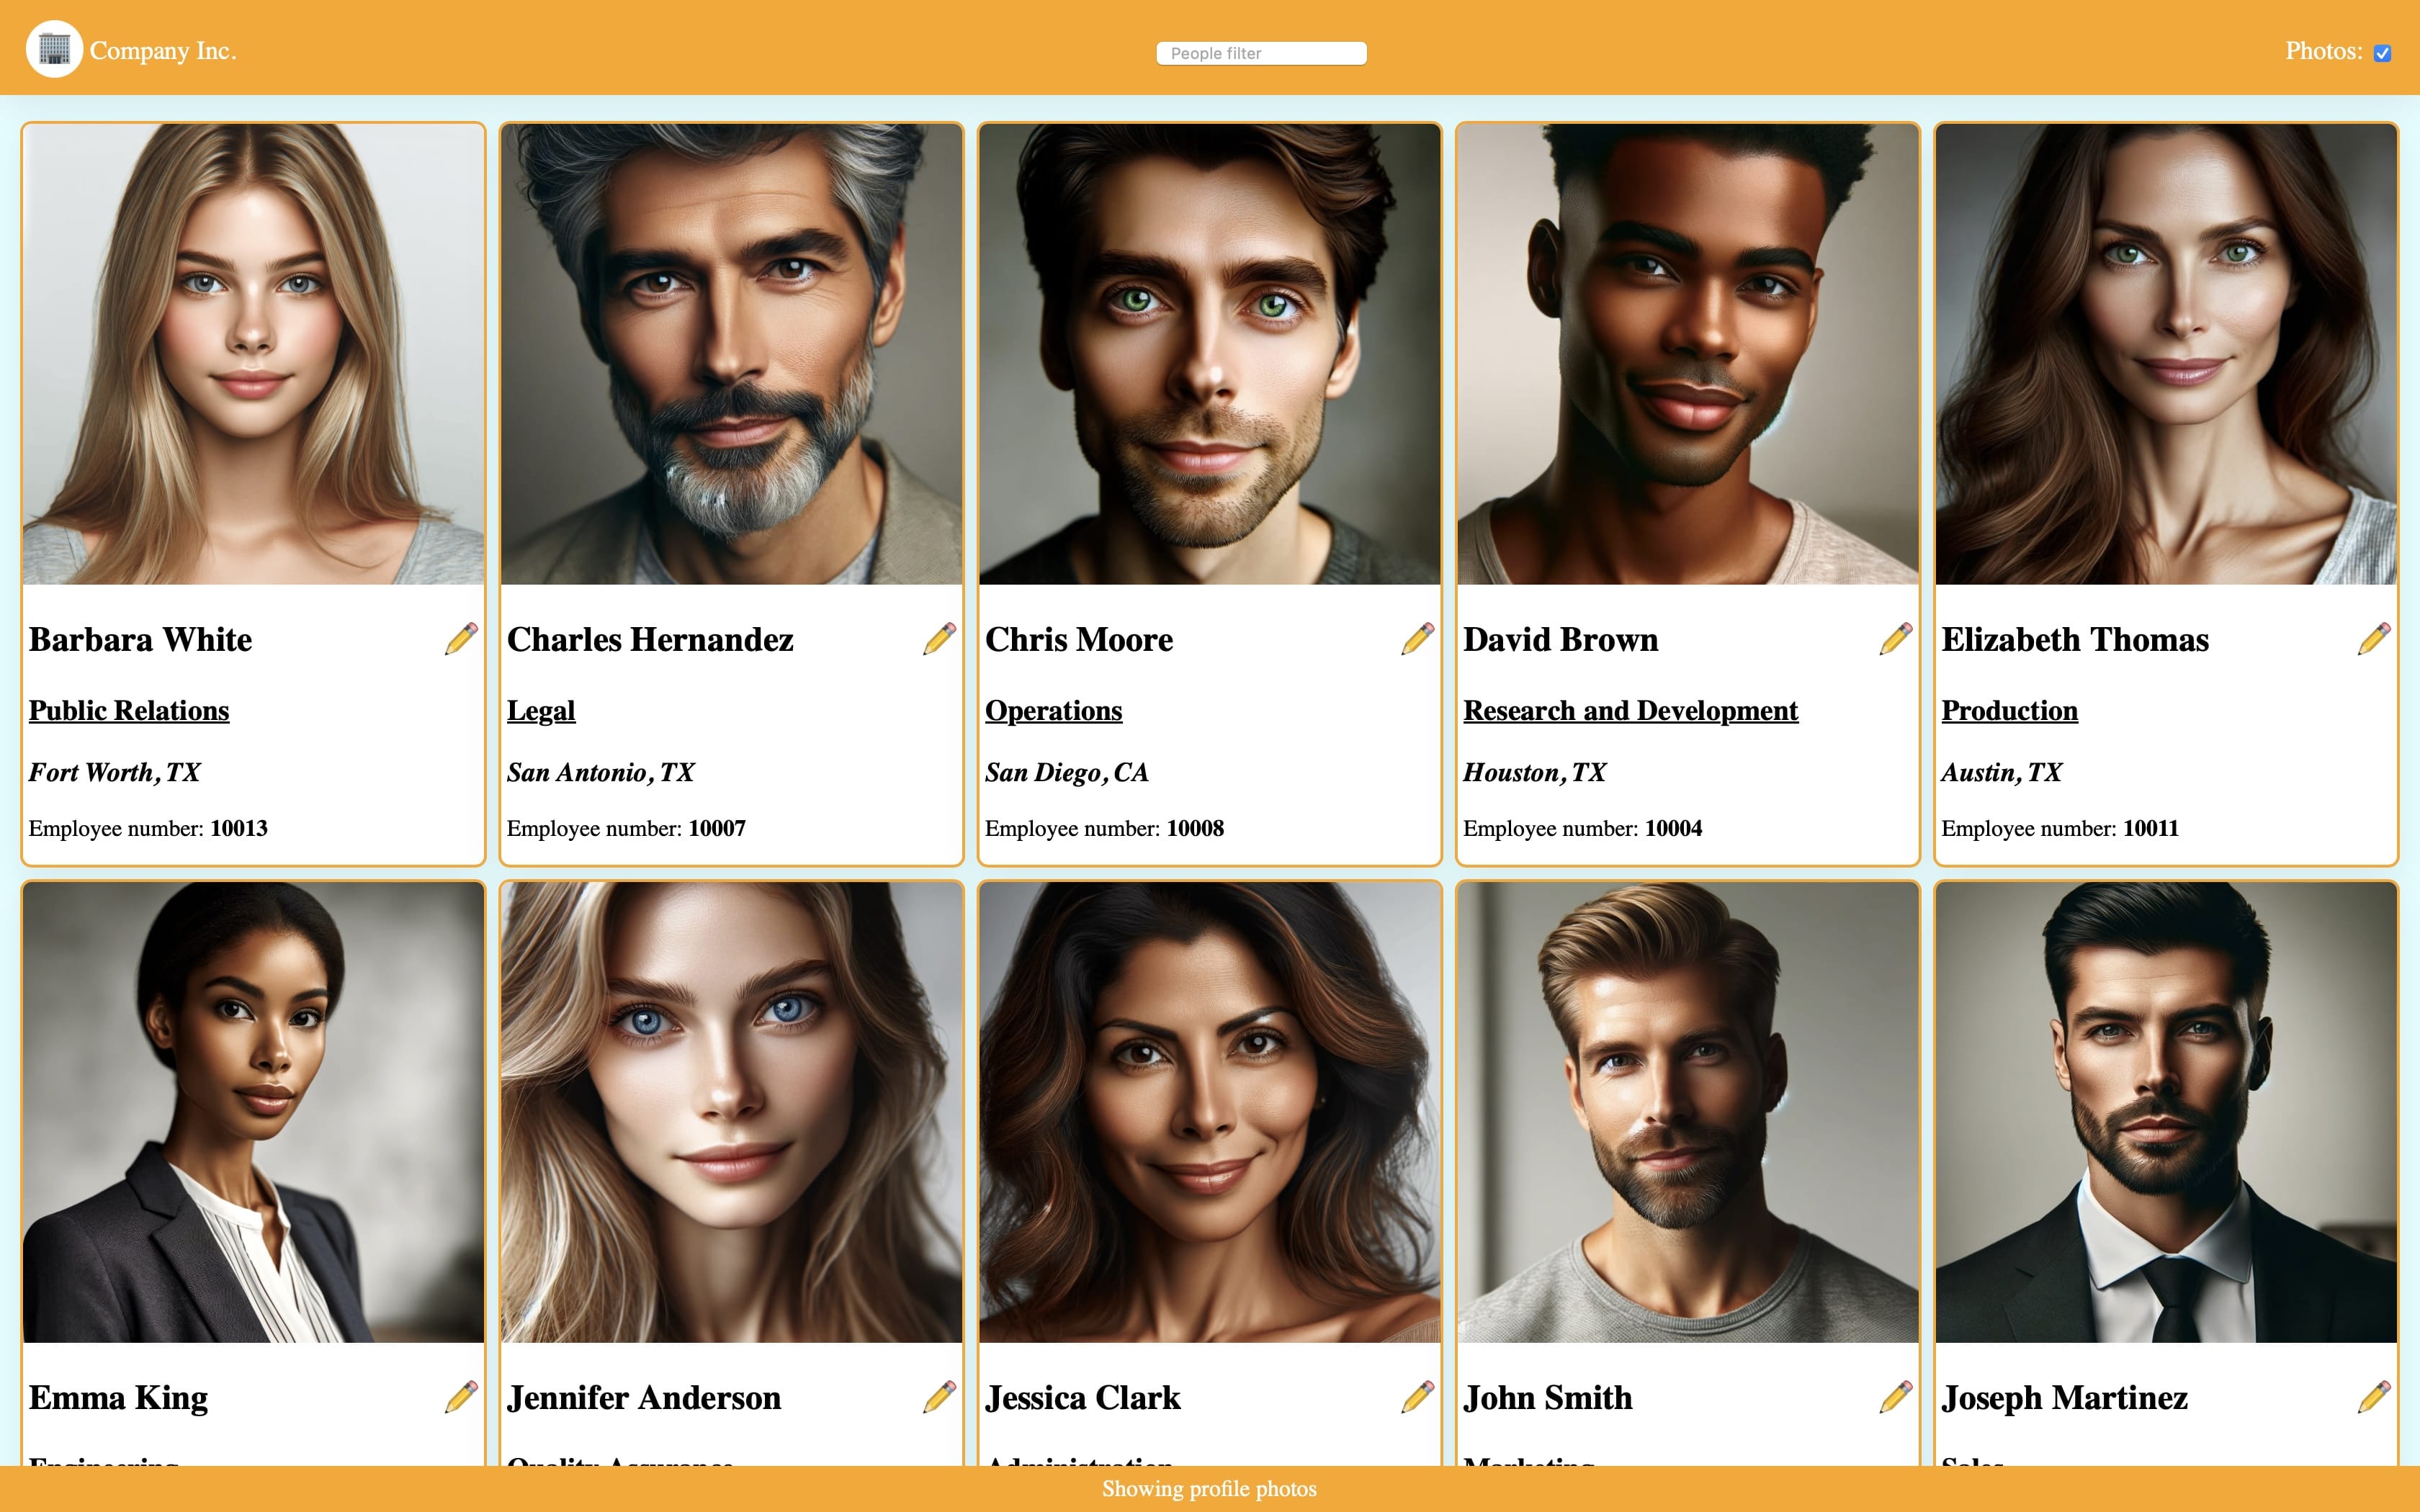
We start by creating a simple card displaying the name, department, and location of an employee.
<article>
 <h1 data-text="${employee.name}"></h1>
 <h3>
  <ul data-text="${employee.department}"></ul>
 </h3>
 <h3 data-html="<i>${employee.location}</i>"></h3>
</article>
In this example, we use the attribute data-text to display the name and department details of the employee. We use the data-html attribute to display the employee's location embedded in an <i> tag.
-
Dynamic Attributes: Use
data-attr-*to update the attribute of an HTML Element. We'll add a photo, phone number and email address of the employee to the card.
<article>
 <img width="240" data-attr-src="${employee.photo}"
  data-attr-alt="Picture of employee ${employee.name}"/>
...
 [<a data-attr-href="tel:${employee.phone_number}"
   data-text="${employee.phone_number}">
 </a>]
 [<a data-attr-href="mailto:${employee.email}"
  data-text="${employee.email}">]
 </a>
</article>
In this example, we add an image to display the profile picture and set its src property with the data-attr-src attribute. We also add the phone and email fields with the data-attr-href attribute and use the data-text attribute to display it.
-
Conditional Rendering: Employ the
data-ifattribute to show or hide elements conditionally. For example, you can display different content based on user preferences.
<img data-if="showPhoto" ...."/>In this example, we add a data-if attribute to the image to conditionally display the profile picture of the employee. If the showPhoto is true the photo is visible, if it is set to false, the photo is hidden.
-
Styling and Animation: The
data-styleanddata-classattribute enables dynamic CSS styling. You can create styles based on state and/or changes triggered by user actions.
<head>
 <style>
  .hq::after {
   content: ' !!!';
   font-size: small;
  }
 </style>
</head>

<hr data-if="!showPicture"
 data-style="background:${employee.gender=='Female'
  ? 'pink':employee.gender=='Male'
  ?'lightblue':'lightgreen'};
  height:0.25rem;border:0;"/>

<h3 data-html="<i>${employee.location}</i>"
 data-class="hq:employee.location=='Boston, MA'">
</h3>
In this example, we use the data-style attribute to add a colored separator to the card. The color is based on the gender. It is only displayed if the showPicture is false.
We also dynamically add a class hq if the location is Boston, MA to the location field. The class adds a smiley after the location.
-
Data Tables and Lists: Utilize the
data-forattribute to generate dynamic tables, lists, or other repeating elements. This helps display data retrieved from APIs or databases.
const employees =
[
 {
  "name": "John Smith",
  "email": "[email protected]",
  "phone_number": "555-0100",
  "department": "Marketing",
  "location": "New York, NY",
  "gender": "Male",
  "employee_number": "10001",
  "photo": "photos/10001.jpg"
 },
...
]<main data-for="employee:employees"
<article style="display:flex; ...">
<img
data-if="showPicture"
data-attr-src="${employee.item.photo}"
data-attr-alt="Picture of employee ${employee.item.name}"
data-attr-title="${employee.item.name}"
width="100%"
/>
....
</article>
</main>In this example we take the article element from the previous example and wrap it with a main element with a data-for attribute that loops over the employees array and displays an article element for each employee.
Note we refer to the employee record with the
employee.itemreference.
Reken simplifies the process of building interactive user interfaces. You can enhance user experience and gather user input with ease. Here's how Reken can be used for this purpose:
-
Two-Way Data Binding: The
data-valueattribute allows you to bind HTML input elements (e.g., text fields, checkboxes) to JavaScript variables. When users input data, it updates the associated variables, and vice versa.
<header style="background:orange;color:white;
 position:sticky;top:0;left:0;padding:1em;font-size:large;
 margin-bottom:1em;opacity:0.95;">
 <nav style="display:flex;justify-content:space-between;
  align-items:baseline;">
  <span>
   <span style="font-size:1.2em;background:white;
    padding:0.5rem;border-radius:50%;">
    ✽
   </span>
   Company Inc.
  </span>
  <label>Photos:
   <input type="checkbox" data-value="showPicture"/>
  </label>
 </nav>
</header>
In this example, we add a header to the page. The header contains a nav element with a company logo and name on the left and a checkbox to toggle the value of showPicture variable; this affects the display of the img and hr elements in the article element.
let showPicture = true;
let filterString = "";<header>
<nav>
<span>...</span>
<input data-on-input="filterString=e.target.value" type="search" placeholder="People filter"/>
<input type="checkbox" .../>
</nav>
</header>
<main data-for="employee:employees.filter((emp)=>emp.name.toLowerCase().indexOf(filterString.toLowerCase())>=0)"
....In this example, we add a people filter control in the nav element. It updates the filterString variable. The content is used to filter the list of employees.
-
Forms: With the
data-valueattribute, Reken makes creating input forms easy.
<main style="display:flex;flex-direction:column;align-items:center;
 flex-wrap:wrap;gap:0.5rem"
 data-if="employees">
 <h1 data-text="Update employee ${employees[0].employee_number}"></h1>
 <form style="margin:1em;padding:2em;background:orange;display:grid;gap:1rem;grid-template-columns: 1fr 3fr;border-radius:0.5rem;box-shadow: rgba(149, 157, 165, 0.2) 0px 8px 24px;">
  <label for="name">Name:</label><input id="name" data-value="employees[0].name"/>
  <label for="dept">Department:</label><input id="dept" data-value="employees[0].department"/>
  <label for="loc">Location:</label><input id="loc" data-value="employees[0].location"/>
  <label for="phone">Phone:</label><input id="phone" data-value="employees[0].phone_number"/>
  <label for="email">Email:</label><input id="email" data-value="employees[0].email" type="email"/>
 </form>
</main>
In this example, we build a form that updates the first employee of our array of employees. It creates a main Element to host the form. The main element contains a h element with the employee id and a form element. The form contains a several label / input combinations bound to the fields in the employee record with the data-value attribute.
When the user modifies one of the fields, notice that the data in the card of the first employee immediately updates.
Reken makes it straightforward to work with REST APIs, enabling your web application to communicate with external data sources. Here's how you can integrate REST APIs with Reken:
-
Data Fetching: The
data-restattribute allows you to fetch data from a REST API and bind it to JavaScript variables. This data can be automatically updated when the API endpoint changes.
<body data-rest="employees:employees.json" ....<script>
let employees;
...In this example, we added a data-rest attribute with an attribute value that loads the employee.json file into the variable employees.
Since the employees variable is initialized with the data-rest attribute, we can remove the employee's array in the source code.
NOTE: Since the
employeevariable is undefined until the JSON file gets loaded we need to hide all the content that relies on it with adata-ifattribute.
<main data-if="employees" ....-
Response Handling: Reken provides classes like
reken-rest-busy,reken-rest-done, andreken-rest-errorthat allow you to style elements based on the status of REST API requests. This is valuable for providing feedback to users during data retrieval.
<style>
 body.reken-rest-busy {
  background: silver;
 }
 body.reken-rest-done {
  background: lightcyan;
 }
 body.reken-rest-error {
  background: lightpink;
 }
 body.reken-rest-error::after {
  content: 'Error loading employees!';
  font-size: 300%;
 }
....
</style>
This example uses the data-rest managed classes that are added during the various phases of the REST call. When the file is being loaded, the body element's background gets the silver color as the class reken-rest-busy is present. When an error occurs during the REST call, the body element's background turns red, and an error message is displayed. The background turns blue when the REST call is completed succesfully.
Reken provides a routing mechanism that makes it easy to make Single Page Applications (SPA). It also supports dynamic routing, where a page can be initialized with one or more parameters.
First, we define the pages in the application.
<main data-route="employee/#employeeIndex" ...>
....
</main>
<main data-route="" ...>
....
</main>
In this example, the two main pages are updated with the data-route attribute.
The employee entry form has a route that starts with employee followed by the employeeIndex parameter. To indicate that employeeIndex is a parameter, it is preceded by a hashmark ('#').
The page showing all the employees has a route with an empty string, making it the default page.
<article>
...
 <div>
...
  <a
   data-attr-href="#/employee/${employee.index}"
   title="Edit employee"
   style="font-size:1.5rem;position:absolute;right:0;top:0;
    text-decoration:none;transform:rotate(90deg)">
  ✏️
  </a>
 </div>
</article>
In this example, we create a link in each employee article that points to the employee edit page with the employee's index. When the user clicks on the link, the employee edit page shows the employee's data.
<h1 data-text="Update employee ${employees[employeeIndex].employee_number}"></h1>
<form style="margin:1em;padding:2em;background:orange;
 display:grid;gap:1rem;grid-template-columns: 1fr 3fr;
 border-radius:0.5rem;
 box-shadow: rgba(149, 157, 165, 0.2) 0px 8px 24px;">
 <label for="name">Name:</label>
 <input id="name" data-value="employees[employeeIndex].name"/>
 <label for="dept">Department:</label>
 <input id="dept" data-value="employees[employeeIndex].department"/>
 <label for="loc">Location:</label>
 <input id="loc" data-value="employees[employeeIndex].location"/>
 <label for="phone">Phone:</label>
 <input id="phone" data-value="employees[employeeIndex].phone_number"/>
 <label for="email">Email:</label>
 <input id="email" data-value="employees[employeeIndex].email" type="email"/>
</form>
<button type="button" data-action="history.back();">Back</button>
In this example, the input controls are updated to point to the employee based on the employeeIndex instead of 0. At the bottom, a button to return to the employee list page is added.
Reken supports the creation of reusable components that can be inserted into your HTML documents. Components are a great way to maintain consistency and reusability in your web applications. Here's how to create and use components in Reken:
-
Component Definition: Define a component using the
data-componentattribute within a<template>. You can encapsulate HTML, CSS, and even JavaScript specific to the component.
In this section, we create a card component that display the employee's info.
<template data-component="card" data-arg-person data-arg-photo="true" data-arg-edit_link="">
 <style>
  :host>div .hq::after {
   content: '☺';
   font-size: small;
  }
 </style>

 <article
  style="min-width:320px;border:2px solid orange;border-radius:0.5rem;
   box-shadow: rgba(149, 157, 165, 0.2) 0px 8px 24px;overflow:hidden;background:white;">
  <img data-if="photo" data-attr-src="${person.photo}"
   data-attr-alt="Picture of employee ${person.name}" data-attr-title="${person.name}"
   style="width:320px;height:320px;" />
  <div style="margin:0.25rem;margin-bottom:1rem;position:relative;">
   <h1 data-text="${person.name}"></h1>
   <hr data-if="!photo"
    data-style="background:${person.gender=='Female'?'pink':person.gender=='Male'?'lightblue':'lightgreen'};height:0.25rem;border:0" />
   <h2><small><u data-text="${person.department}"></u></small></h2>
   <h3 data-html="<i>${person.location}</i>"
    data-class="hq:person.location=='Boston, MA'"></h3>
   <div>Phone: <a data-attr-href="tel:${person.phone_number}"
    data-text="${person.phone_number}"></a></div>
   <div>Email: <a data-attr-href="mailto:${person.email}"
    data-text="${person.email}"></a></div>
   <a
    data-if="edit_link"
    data-attr-href="${edit_link}"
    title="Edit employee"
    style="font-size:1.5rem;position:absolute;right:0;top:0;
        text-decoration:none;transform:rotate(90deg)">
    ✏️
   </a>
  </div>
 </article>
</template>
In this example, we move the whole article in a card component. The card component takes three arguments. A reference to a person object, an optional boolean photo to show/hide the profile picture, and an optional edit_link argument to indicate what URL to go to when the edit button is pressed. If the latter is not specified, the edit pencil button is hidden. Note we also moved the hq class definition into the component.
-
Component Usage: Use a component by adding a regular HTML element with the
data-componentattribute. This will replace the component reference with the content of the component definition. Components can also accept arguments and bindable variables.
<card
 person="employee.item"
 photo="showPicture"
 edit_link="#/employee/${employee.index}">
</card>
In this HTML fragment, we use our card component and specify the person, photo, and edit_link arguments.
- Slots: Components support slots, allowing you to transfer custom content into the component. This provides flexibility in reusing components with different content.
To make the card more flexible, we wrap the phone number and email address in a slot element.
<template data-component="card">
 <article>
 ....
 <slot>
  <div>Phone: <a data-attr-href="tel:${person.phone_number}"
   data-text="${person.phone_number}"></a></div>
  <div>Email:
   <a data-attr-href="mailto:${person.email}" data-text="${person.email}"></a>
  </div>
 </slot>
....
</article>
</template>
In this fragment, we wrap the phone and email in a slot element, which continues to make them default content. Now, the card can be used in another application with different info.
<card person="employee.item" ...>
 <div>Employee number:
  <strong data-text="${employee.item.employee_number}">
  </strong>
 <div>
</card>
In this fragment, we show how we replace the default slot of the card component with the Employee number.
Reken's timer feature adds dynamic functionality to your application. This makes the application more engaging.
In the final addition to the application we are adding messages that confirm the actions of the user.
<footer
 data-style="height:${message==''?'0':'2em'};position:fixed;
  bottom:0;left:0;right:0;display:grid;place-content:center;
  background:orange;color:white;transition:height 0.3s;">
 <span data-timer="2000:message!='':message=''" data-text="${message}"></span>
</footer>
In this fragment we add a footer at the bottom that displays a height of 2em when the content of the message variable is not empty. The span element has a data-timer attribute that starts when the message variable is not ''. After 2000ms (2 seconds) it clears the message variable, hiding the footer element.
let message = ''This javascript fragment initializes a message variable.
...
<input data-on-input="filterString=e.target.value;message=`Filtering employees by [${filterString}]`" ...

<input data-on-change="message=`${(showPicture?'Showing':'Hiding')} profile photos`" ...

<button type="button"
 data-action="history.back();message=`Finished editing employee ${employees[employeeIndex].name}`">
 Back
</button>

<a data-action="message=`Editing employee ${person.name}`"
 .../>
 Back
</a>
These fragments edit/add event handlers to set the status message. Once the status message is set the footer element is animated in view for 2 seconds.
This chapter shows how to use the Reken attributes to build an informative, interactive, engaging web application. It shows how to display text from javascript data dynamically, make an interactive UI, simply load data from a rest service, create an SPA with different pages, and use timers to update the UI.